


Wieder bei Drunagor weiter gemacht und den Chef fertig bekommen.
Beiträge von abc2030 im Thema „Und was habt ihr so bemalt...?“
-
-

Die sind super geworden. Tolles Farbschema und die Augen kommen richtig gut rüber!
-
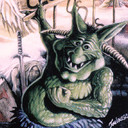
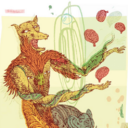
Zwei weitere Wunderländer fertig bekommen.
Das exzessive Blacklining empfinde ich als ziemlich angstrengend, weil man doch ziemlich konzentriert über einen längeren Zeitraum durchhalten muss.
Meine lieblings Maltechnik wird es im Moment jedenfalls nicht.Edit: Bilder vergessen
-

Oh wow, da kann meine Herzkönigin einpacken. Wie genau macht man dieses Backlining?
In meinem Fall habe ich ein schwarzes Ink genommen und klassisch mit einem feinen Pinsel alle Stellen bemalt, bzw. Linien gezogen.
Der Pinsel sollte entsprechend gut Farbe halten und abgeben können.Es geht wohl auch mit Fineliner Stiften. Da kenne ich mich aber nicht aus wie gut das funktioniert.
Hier gibt es eine Facebook Gruppe die sich mit dem Thema beschäftigt:
https://www.facebook.com/groups/comicstyle/Da gibt es richtig abgefahrene Minis.
-
Heute den ersten Versuch mit massivem Blacklining (Vallejo Black Ink) bei Wonderlands War gestartet.
Bin ganz zufrieden. Wenn die Figuren auf dem Tisch stehen, sieht man die Fehler (fast) nicht mehr
-
Oje, wildes gehopse zwischen den Bemalprojekten.
Habe nun Drunagor angefangen und die Rotas Box von BRWR zurückgestellt.
Die ersten Mobs sind fertig. Diesmal habe ich versucht schneller zu sein.
Xpress mit Wash + Bürsten war angesagt.
Bei den grünen Burschen habe ich noch mit verdünntem Rot die Tiefen gefärbt.
Hat pro Mob ca. 3h gedauert.Jetzt kommt noch frisch Wonderlands War dazu.
Wurde heute zur Abwechslung Weiß grundiert, da ich einen flacheren Comiclook mit viel Blacklining ausprobieren will. -
Bin noch an der Rotas Box von Black Rose Wars dran.
Jedoch habe ich zum Spaß "Altlasten" eingeschoben und ein paar Confrontation Figuren fertig bekommen.
Bin schon gespannt was Monolith mit der kürzlich eingekauften Lizenz anstellt.Und Boris mit seinen Killer Häschen von Moonstone.
-
Die Grundbox von Black Rose Wars Rebirth ist endlich fertig + Jukas + Irene + der König in Gelb.
3x Colossus:
Arianna:
Irene:
Bei Jukas hatte ich aus Versehen ein paar weiße Spritzer auf dem bereits bemalten Mantel.
Also hab ich mich im Sprenkeln versucht um das zu kaschieren:Und der König in Gelb.
-
-
-

Kurze Frage:
Mein Sohn hat Felsen aus Trockenton gebastelt. Kann man den direkt mit Grundierung ansprühen oder sollte man hier auf etwas anderes zurückgreifen?
Danke!

Hab mir aus Trockenton mit Struckturrolle mal Straßen gebastelt. Nach dem Durchtrocknen war das Grundieren kein Problem.
-
Habe die restlichen Modelle von Eclipse fertig. Wird Zeit zum spielen

Diesmal wurde gebürstet + Speedpaints und/oder Vallejo Shifter verwendet.
-
Bei den Farben hast du dich an den ursprünglichen Farben der Fraktionen orientiert? Die sehen echt stark aus! Ich glaube, ich muss meine Minis dann doch auch noch anmalen. Welche Grundierung hast du genommen? Sieht aus, als würde sich der Bemalaufwand mit den Speedpaints in Grenzen halten... und gebürstet hast du gar nicht, richtig?
Danke und ja, Farben sind grob wie die Ursprünglichen.
Grundierung ist gleich wie bei JulWest, Army Painter – Plate Mail Metal.Bemalaufwand dauerte schon ein paar Stunden, da ich außer bei Schwarz immer mit einer Sekundärfarbe aufgelockert habe. Hierfür habe ich die Stellen erneut mit Silber bepinselt.
Gebürstet wurde nicht.
-
Bei meinem Eclipse Projekt sind nun endlich alle Spielerfraktionen fertig.
Grundlage ist eine Silbergrundierung und dann mit Speedpaints (+Medium 2:1) drüber.
-
Das mit dem "Farbe einsparen" solltest du hinter dir lassen. Das blockiert nur den kreativen Fluß.
Selbst wenn man ein paar Tröpfchen mehr als sonst verbraucht, muss man schon unmengen an Minis bemahlen, damit die leer werden.
-
Heute endlich eine schön länger rumliegende halb bemalte Mini von Massive Darkness 2 vollendet:
-
Oathsworn Encounter #2
Spoiler anzeigen
Das riesige Monster ist fertig und wird hoffentlich bald erlegt.
Irritiert hat mich der Hohlraum bei den Schädeln der Standarte. Sogar das Holz wurde wohl magisch unsichtbar gemacht. -
Habe die riesigen und tollen Minis von Oathsworn angefangen.
Die Ratten noch ohne Spoiler. Sind noch in Akt 1 und ich bin gespannt was da noch aus den Boxen springt.Und der Priester ist bereits fertig:
-
Bei mir ging es bei Massive Darkness 2 weiter
-
Fast alle Massive Darkness 2 Charaktere vom Grundset fertig bekommen
-
Ich bemale die Minis auf der original Base. Bin zu faul die zu stiften.
Wenn zuviel Gel auf der Sohle landet, kommt es seitlich schon Mal zu frosting. Sehe das aber wie bei unsauberer Bemalung, am Ende sieht man es selbst nur wenn man sich die Minis von nahem anschaut. In Aktion auf dem Brett bleibt keine Zeit für Eitelkeit.
-
Hat sicher jeder seine eigene Technik.
Mit dem Bastelmesser geht das bei mir ganz gechillt und dauert nicht lange.
Selbst wenn etwas Sohle mal an der Base hängen bleibt, werden das die wenigsten überhaupt wahrnehmen.
Bei einer der 9 Figuren ist der Schuh nämlich etwas flacher. Ihr dürft raten bei welcher -
Sind die Bases "von Werk aus" durchsichtig oder hast du diese ersetzt? Und falls du sie ersetzt hast: wie kriegt man Figuren vernünftig von Bases getrennt? Hast du/hat jemand da Tipps?
Die Bases habe ich getauscht. Ist eigentlich ganz einfach.
Ich kippe die Figuren auf die Seite und schneide mit einem Bastelmesser in wippender Bewegung langsam von oben nach unten an der Base entlang.
Dabei fange ich immer mit dem unteren Bein an und drehe dann die Base damit ich immer um unteren Drittel sauber schneiden kann.
Wenn wie bei dem Alien mehrere Zehen oder ähnliches rausragen. Schneide ich auch vorab einmal rundum ein, damit da nichts "verloren" geht.
Dann klebe ich mit einem Sekundenklebergel. Hier meine Ausrüstung von heute: -
Meine letzten Figuren der Core Space Erweiterungen Zed + Cygnus sind endlich fertig.
Die Figuren haben mich jetzt über ein Jahr lang aus meiner ToDo Box angestarrt.Wird Zeit zum Spielen
-
Habe meine erste Massive Darkness 2 Mini fertig
-
Sehr schick. Moonstone spielen bei uns im Freundeskreis auch ein paar Leute, da sind ein paar witzige Minis dabei 👌🏻
Danke. Die tollen Minis machen auch richtig Laune zum Bemalen.
-
Habe ebenfalls Moonstone bemalt und heute den letzten Goblin Piraten fertig bekommen:
Und am Wochenende die Dame vom Ausschank mit ihrem Team:
-
Schnelle Nummer für die Nemesis Türen (1x Trockenbürsten, 2x Akzente + Rostgeschmiere)
-


Habe die Nemesis Fungi Dinger fertig bekommen:
Sau gut. Da würde ich mich inspieren lassen. Wie hast du das gemalt, wenn man fragen darf?
Danke dir. Hatte mich ebenfalls von jemanden anderen hierzu inspirieren lassen
Habe hier meine neue Airbrush ausprobiert und auf schwarze Grundierung zuerst ein dunkles Rot von der Seite gesprüht.
Dann mit 3 verschiedenen Grün immer weiter von oben.
Es folgte ein Drybrush Versuch mit hellem Ocker. (Mehr Bilder hab ich leider nicht gemacht)Das war mir aber dann zu eintönig und ich habe mit dem gleichen dunklen Rot einzelne Bereiche hervorgeholt und in Vertiefungen das Rot stark verdünnt aufgetragen.
Bei der Pilzmutterkönigingdingens den oberen Bereich zusätzlich mit einem Lila.
Danach wieder die neuen Bereiche gebürstet.
Durch das trockenbürsten wirkte alles aber irgendwie zu pastellig und nicht mehr organisch und ich habe dann mit braunem, roten und auch blauem Wash das wieder lebendiger gemacht.Hätte gerne mehr den roten Effekt von unten gehabt.
Aber ich wollte auch nicht allzuviel Zeit hier reinstecken.Könnte mir vorstellen nur mit Trockenbürsten ähnliche Effekte zu bekommen wie mit dem Airbrush.
Mit Rot von unten brüsten und dann mit den Grünen von oben. Das hellste Grün dann halt nur an den obersten Stellen. -
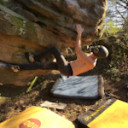
Ahoi. Weitere Armada Schiffe, jetzt auch mit Seilen (hab ich vorher noch nie gemacht)
Mit den Seilen sieht das richtig toll aus.
Das ist doch sicher extrem ein Gefummel oder? -
Habe die Nemesis Fungi Dinger fertig bekommen:
-
Es tut mir leid eine Bevölkerungsgruppe pauschalisiert zu haben.
Ich entschuldige mich demütigst bei allen Skeletten
-

Drei der fünf Skellette aus der Undergrounds Warband Sons of Velmor die ich in ner guten Woche in einem Warcry Turnier austesten werde.
Das Farbschema gefällt mir.
Für Skelette sehen für meinen Geschmack nur die Rüstungsteile zu arg poliert aus. -
Young Rachel
Sieht toll aus, nur die Base empfinde ich als zu hell und lenkt mich von der Mini ab.
-

"Nur" gebürstet, oder gabs noch weitere Behandlung? Würde mich über das genaue Rezept sehr freuen. Ich bin bei einer meiner letzten Figuren an nem ähnlichen Ton kolossal gescheitert. Man mag ja gar nicht glauben, wieviele unterschiedliche doch-nicht-richtig-Farbtöne man an einem einzigen Wochenende produzieren kann.
Grundierung war bei allen mit schwarz gleich. Blau, Grün und Rot sind nur gebürstet.
Gelb und Lila haben bei einem Test mit dem Airbrush die Grundfarbe zenithal besprüht bekommen.
Dann gab es noch eine Runde Trockenbürsten.Glaube das Lila bekommt man auch so mit nur bürsten hin.
Grundfarbe war Vajello Model Color Magenta und dann ein mit Weiß leicht aufgehelltes Vajello Game Color Pink. -
Bei "Rising Sun" sind nun alle Fraktionen durchgebürstet.
Jetzt sollte ich es vielleicht auch mal spielen
-
Mal wieder Moonstone bei mir
-
1x zur Sicherheit im Seifenwasser schrubben schadet nicht. Ärgerlicher ist wenn dann doch ein paar Stellen nicht gewillt sind den Primer gleich zu akzeptieren.
-
Habe die Königin von Nemesis endlich fertig bekommen.
Die Haut ist mit drei verschiedenen Vallejo Shifter Farben gesprüht worden.
Deswegen gibt es auch extra viele Bilder um den Effekt etwas besser zeigen zu können. -
Ich hab für Core Space zum ersten Mal durchsichtige Bases ausprobiert und einfach Gel-Sekundenkleber verwendet. Damit halten selbst Figuren auf einem Bein sehr gut.
Wenn zu viel Kleber dran ist, quillt der natürlich an den Seiten raus und das sieht dann etwas unschön aus wenn man da genauer hinschaut. Das kann einem beim 2K aber genauso passieren. Fällt aber nicht weiter auf, wenn die Figuren auf dem Tisch zum Spielen stehen.
Stiften musste ich zum Glück bisher nicht. Bei schwereren Figuren auf wackeligen Beinchen ist das wahrscheinlich besser.
Edit: Ich hab die Figuren erst bemalt und dann mit einem Bastelmesser abgesägt.